How to network your DYMO badge printer
|
NOTICE: Networking your printer will only work if your kiosk is in the same domain as the computer you are trying to execute the print from |
Network your LobbyGuard Visitor Badge Printer
The visitor badge printer in your LobbyGuard kiosk can be removed from the kiosk and relocated anywhere in your building. This feature allows for a receptionist or security guard to receive the printed visitor badge so that additional security precautions can be taken before the badge is given to the visitor. For example, a security guard could review the visitor sign-in record via the LobbyGuard Administrative Utility.
IMPORTANT: Information Technology / Support staff should be made aware of this modification and should be involved in this process.
Follow these steps to network your visitor badge printer:
-
Order the Power Supply, Power Cord and USB Cable. Depending on your kiosk model, in order to relocate your printer you will need to order a new power supply, power cable, and USB cable for the printer. You will not be able to use the printer cables that are installed in the kiosk for older units. You can order these parts directly from Dymo by calling their toll-free number at 1-877-289-3966. You will need to order the following:
- Power Cord
- Power Supply
- USB Cable (A to B)You will need to know which model printer you have before placing your order. The model is printed on the front of the printer, ie “Labelwriter 400 Turbo” or “Labelwriter 450 Turbo”, etc. Do not proceed with this operation until these items are available and ready for installation. Please check to verify whether or not you need to order these parts, if they are spliced.
-
Uninstall the printer from the kiosk. Access the Windows desktop on the LobbyGuard kiosk and click the START menu. Choose SETTINGS, then choose PRINTERS AND FAXES. You will see a printer listed as DYMO Labelwriter. Right-mouseclick on this printer and choose DELETE from the drop-down menu that appears. The printer will be removed from the list of installed printers. Perform this task until all DYMO printers have been removed.
-
Remove the printer from the kiosk. Open the printer door (located on the left side of the kiosk) and remove the printer by unplugging the two cables from the bottom of the printer.
-
Install the printer software on the PC. From the PC where you wish to install the printer, go to the following link to download and install the latest Dymo printer software on the PC:
DYMO LabelWriter 450 Turbo http://global.dymo.com/ieIE/Software/LabelWriter_450_Turbo.html
DYMO LabelWriter 400
http://global.dymo.com/ieIE/Software/LabelWriter_400.html
IMPORTANT: Do not attach the printer to the PC until this software has been installed.
During installation you will be asked if you wish to install this printer on a USB Port or Network (LAN). "Choose USB port"Once the software installation is completed you may attach the printer to the PC.
-
Network the Printer. From the Windows desktop of the PC where the printer has been installed, click the START button and choose Settings…Printers and Faxes. You should see the Dymo LabelWriter listed. Right-mouse click on this printer and choose Sharing… from the drop-down menu. You will see the following screen:
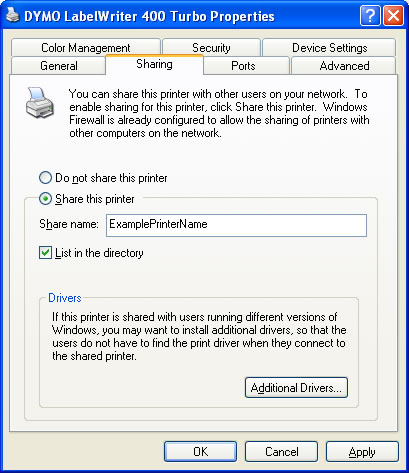
Choose the option “Share this printer” and give the printer a name, then click the OK button. Note: if the PC is on a network domain, the kiosk must also be put onto the same domain beforehand.
Before proceeding to the next step, be sure you know the name of the PC to which this printer has been installed. This information can be found by clicking on Start…Control Panel…System, and clicking on the tab labeled “Computer Name”.
The PC name is listed as “Full computer name”. You will need this information in the next step.
-
Install the networked printer on the LobbyGuard kiosk.
Access Printers and Faxes by clicking Start in the bottom left of the screen and click on Printers and Faxes
In the Printers and Faxes window select “Add a printer” on the left side of the window
Selecting this will bring up the Add Printer Wizard, which from there you have two options to find and add your printer
OPTION 1-
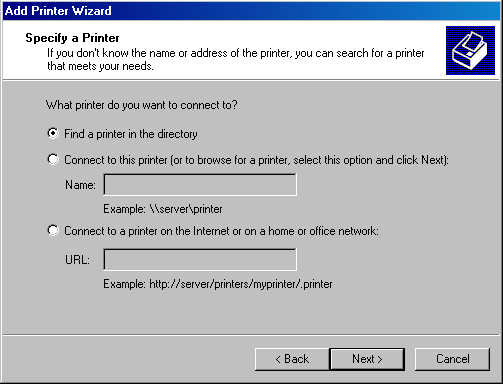
Access the Windows desktop on the kiosk and click on Start…Settings…Printers and Faxes. From the File menu choose “Add a Printer”. The Add Printer wizard will appear and walk you through the steps of adding the printer to the kiosk. Choose “A network printer, or a printer attached to another computer” when you see the screen below:
The next step is to enter the name of the printer. Choose the second option, as shown below, and enter the name of the printer as shown in the example. For example, if the name of the PC (from step 5, above) is “FrontDeskPC” and the name given to the printer (from step 5, above) is “badgeprinter” then you would enter \\FrontDeskPC\badgeprinter into the “Name:” field, and click “Next”.
Once you have completed the wizard, the Dymo printer should appear in your Printers and Faxes screen on the LobbyGuard kiosk. At this time you should restart your kiosk and sign in to test your new badge printer location. The badge should print at the new printer location.
OPTION 2-
If you need additional assistance on this process, please contact your IT Administrator. The following additional documentation is made available for Microsoft Windows and the Dymo LabelWriter:
http://www.dymo.com/media/UserGuides/DYMOLabelv8UserGuide.pdf